
KH 350 DESIGN AUDIO SYSTEM WITH CD PLAYER AND DIGITAL RADIO - Audio System EBENCH - Free user manual and instructions
Find the device manual for free KH 350 DESIGN AUDIO SYSTEM WITH CD PLAYER AND DIGITAL RADIO EBENCH in PDF.


| Product Type | Audio system with CD player and digital radio |
| Brand | EBENCH |
| Model | KH 350 |
| Mains power | 230 V ~ 50 Hz |
| Output power | 2 x 5 W RMS / 100 W PMPO |
| CD player | Semiconductor laser |
| FM radio | 87.5 MHz - 108 MHz |
| AM radio | 522 kHz - 1620 kHz |
| FM antenna | Flexible antenna |
| AM antenna | Built-in ferrite loop |
| Radio presets | 20 stations (10 FM + 10 AM) |
| CD functions | Play, pause, stop, skip, search, repeat, random, program |
| Equalizer | Flat, Classic, Rock |
| Remote control | Yes, with AAA batteries (not included) |
| Headphone jack | Stereo mini-jack 3.5 mm |
| Auxiliary input | Cinch input (AUX) |
| Speakers | Detachable speakers with connections (+/-) |
| Display | LCD |
| Standby consumption | Low (unplug if not used for a long time) |
| Safety | Invisible laser radiation - do not open; class 1 |
| Maintenance | Soft, slightly damp cloth; no solvents |
Frequently Asked Questions - KH 350 DESIGN AUDIO SYSTEM WITH CD PLAYER AND DIGITAL RADIO EBENCH
User questions about KH 350 DESIGN AUDIO SYSTEM WITH CD PLAYER AND DIGITAL RADIO EBENCH
0 question about this device. Answer the ones you know or ask your own.
Ask a new question about this device
Download the instructions for your Audio System in PDF format for free! Find your manual KH 350 DESIGN AUDIO SYSTEM WITH CD PLAYER AND DIGITAL RADIO - EBENCH and take your electronic device back in hand. On this page are published all the documents necessary for the use of your device. KH 350 DESIGN AUDIO SYSTEM WITH CD PLAYER AND DIGITAL RADIO by EBENCH.
USER MANUAL KH 350 DESIGN AUDIO SYSTEM WITH CD PLAYER AND DIGITAL RADIO EBENCH
natural_image
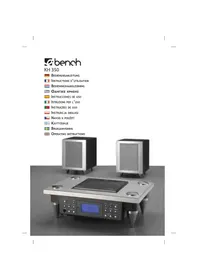
Exterior view of a modern electronic device with three rectangular units and a digital display (no visible text or symbols)BEDIENUNSANLEITUNG.... 5 – 10
INSTRUCTIONS D'UTILISATION 11 – 16
BEDIENINGSHANDLEIDNING 17 – 22
ΟΔΗΓΙΕΣ ΧΡΗΣΗΣ 23 – 29
INSTRUCCIONES DE USO.... 30 – 35
ISTRUZIONI PER L'USO 36 – 41
INSTRUÇÕES DE USO 42 – 47
INSTRUKCJA OBSŁUGI 48 – 53
NÁVOD K POUŽITÍ 54 – 59
KÄYTTÖOHJE 60 – 65
Bruksanvisning....66 – 71
OPERATING INSTRUCTIONS 72 – 77
e-bench
KH 350


natural_image
Exterior view of a speaker with two speakers and a front panel, labeled with numbers 1 and 3 (no text or symbols on the speaker itself)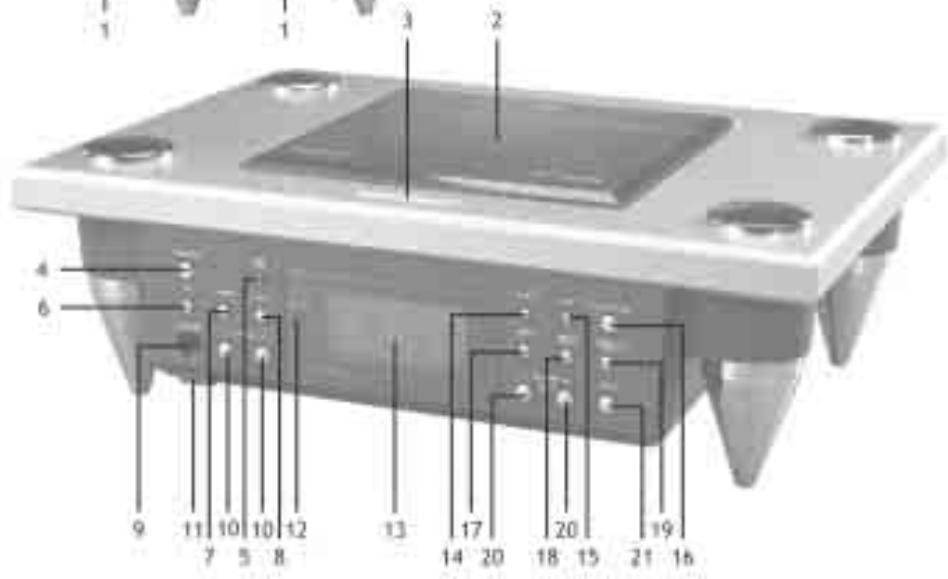

bar
| Category | Value | |---|---| | Top Bar | 100 | | Bottom Bar | 100 |TECHNISCHE DATEN
Allgemein
DÉCLARATION DE CONFORMITÉ
WERKING MET KOPTELEFOON
MANUAL DE INSTRUÇÕES
MANUAL DE INSTRUÇÕES
ANSLUTNING AV ANDRA APPARATER
| Mains voltage | AC: 230 V ~ 50 Hz |
| Output | 2 x 5 W RMS/sine-waves power |
| 100 Watt PMPO |
CD player
| Laser | semi-conductor laser |
Radio
| Frequency range VHF/FM | 87.5 MHz to 108 MHz |
| Frequency range MW/AM | 522 kHz to 1620 kHz |
Aerials
| FM | dipole aerial |
| AM | built-in ferrite aerial |
OPERATING INSTRUCTIONS
Warning and Safety Information
Please read the operating instructions very carefully prior to using the device and ensure that they are kept and easy to find for future reference. All precautionary and safety procedures should be followed exactly as well as the following safety procedures.
Caution! Danger of electric shock!
Never open the appliance or component housings! None of the components included within the scope of the delivery can be serviced by the user. Any servicing is to be carried out by qualified personnel only.
This warning symbol informs the user of the dangerous voltage in the device.
This warning symbol informs the user of important operating information for this device
Warning!
Non-perceivable escape of laser radiation if the device interlocks are opened or damaged. Avoid any contact, especially eye contact, with the laser beam! Danger of serious eye injuries exists.
SETTING-UP THE DEVICE
- When setting-up the device ensure that it is not in the immediate vicinity of water, e.g. on a bathtub, wash basin, rinsing sideboard, in damp cellars, next to a swimming pool, etc.
- When setting-up the device ensure that it is not in the immediate vicinity of heat sources, e.g. ovens, air heaters or other heat generating devices.
• Ensure that the device is set-up upon a stable and level base. - The device must be set-up in a place that guarantees sufficient all-round ventilation. The distance between the device's rear-side and wall should not be less than 10 cm, also not less than 10 cm above the device and at least a 5 cm space on either side. Thus the device should not be placed in book shelves, other closed off cabinets or on wall shelving units filled with other items. In addition, the ventilation can be impaired if the device is placed on a bed, blanket or similar surface.
- Ensure that no foreign substances or liquids can enter the device through the ventilation inlets.
• The laser scanner of the CD player can ingress humidity when:
- the set-up position is quickly changed from a cold area to a warm area
- a heating unit is suddenly turned on
- the unit is set-up in a differently acclimatised room.
Malfunctions can occur if there is a build-up of condensation within the device. In this case the device should not be used for several hours until normal playing is once again possible.
POWER SUPPLY
When using the device in mains supply operation it is imperative that you comply with all technical data and instructions found in the operating manual and those on the device.
- Caution! Use only the mains cable supplied with the device otherwise there is a danger of fire and/or electrical shocks!
- When disconnecting from the mains, be sure to grip the plug when pulling out from the socket and never pull out by gripping the cable.
- Never handle the mains cable and/or the plug with damp or wet hands because of the danger of electrical shocks!
- Handle electrical cables with care; do not buckle or crimp the cable. Cables should not be laid on the floor in such a way it is possible to step on them. Please be especially careful with the mains cable between the electrical socket and the device.
- Using cables and plugs which do not correspond to the stipulated voltage can result in fire and/or electrical shocks. If the equipment is not going to be used for a long period of time, it should be unplugged from the mains power supply and the batteries removed. The device is still electrically live even if it has been turned off but the plug is still in the mains supply socket.
OPERATING ELEMENTS AND DISPLAY
FUNCTION
| 1. | Loudspeakers | |
| 2. | CD compartment | |
| 3. | OPEN/CLOSE button | Opens/closes the CD compartment |
| 4. | STANDBY | Switches the appliance on/puts the appliance on standby mode |
| 5. | EQ button | Selects the equaliser curves |
| 6. | CD button | Activates the CD player |
| 7. | TUNER button | Activates the radio |
| 8. | AUX button | Activates the aux. mode |
| 9. | Phones | Headphones connection |
| 10. | VOLUME +/- buttons | Controls the volume |
| 11. | POWER button | Switches the system on/off |
| 12. | Signal receiver for remote control | |
| 13. | LCD display | |
| 14. | INTRO button | Activates the preview function |
| 15. | MIX button | Activates the random play function |
| 16. | PLAY/PAUSE button | Starts playing/pauses CD |
| 17. | BAND button | Selects AM/FM waveband |
| 18. | MEMO/PROGRAM button | Activates the programming function |
| 19. | MEMO-UP/REPEAT button | Repeats individual/all CD tracks |
| 20. | TUNING/SKIP/SEARCH +/- buttons | When used with CD player: skips to the beginning of the next track/to the beginning of the track which is currently playing or forward/reverse search; When used with the tuner: automatic tuning |
| 21. | STOP button | Stops playing the CD |
Remote control
- POWER button
- MUTE button
- EQ button
OPERATING INSTRUCTIONS
-
MIX button
-
BAND button
-
INTRO button
-
MEMO-UP/REPEAT button
-
MODE/REMAIN button
Changes display: track playing time/remaining playing time of entire CD
-
MEMO/PROGRAM button
-
VOLUME +/- buttons
-
PLAY/PAUSE button
-
STOP button
-
CD button
-
OPEN/CLOSE button
-
AUX button
-
TUNER button
-
TUNING/SKIP/SEARCH +/- buttons
SWITCHING THE SYSTEM ON
Connecting the loudspeakers
To connect the loudspeakers, connect each black cable to the (−) connecting terminal and each red cable to the (+) connecting terminal at the back of the appliance.
Mains operation
Before you continue, check whether the mains voltage stated on the back of the appliance corresponds with your local mains voltage. Then insert the mains plug of the appliance into a socket.
Inserting the batteries into the remote control
Open the lid of the battery compartment. Insert the batteries (2xAAA, not included in the scope of the delivery) as indicated by the positive and negative pole markings. Close the battery compartment.
Note: If the equipment is not be used for a long period, take the batteries out of the remote control.
Setting the time
- After pressing the MEMO/PROGRAM button in the standby mode, press the SKIP/SEARCH but tons (forwards/backwards) until the correct hour appears on the display.
- Press the MEMO/PROGRAM button again and then press SKIP/SEARCH (forwards/backwards) until the correct minute appears on the display.
- Press the MEMO/PROGRAM button. The correct time will now appear on the display.
Adjusting the volume
To adjust the volume, press the +/- button.
PLAYING A CD
- Press the CD button.
- Open the CD compartment with the OPEN/CLOSE button.
- Insert the CD with the labelled side facing upwards in the CD compartment.
- Close the CD compartment. When the CD starts, the total number of tracks will appear on the display.
- Press the CD PLAY/PAUSE button. The first track of the inserted CD is played. The display indicates the number of the current track and the playing time of the track.
- To activate the pause function, press the PLAY/PAUSE button. The display indicates how much of the track's playing time has lapsed. To continue playing the CD, press the PLAY/PAUSE button.
- To stop the CD, press the CD STOP button. The display indicates the total number of tracks and the total CD playing time.
FURTHER CD PLAYER FUNCTIONS
Repeat function
This function allows you to play an individual track or all the tracks on one CD repeatedly.
- To play all the tracks on the inserted CD repeatedly, press the MEMO-UP/REPEAT button once. REPEAT appears on the display.
- To play an individual track repeatedly, press the MEMO-UP/REPEAT button twice while the CD is playing. REPEAT appears on the display.
- To deactivate the repeat function, press the MEMO-UP/REPEAT button again until REPEAT dis appears from the display.
Mix function
With the mix function, the tracks of the inserted CD are played in random order. To activate this function, press the MIX button. MIX appears on the display. To deactivate the mix function, press the STOP or MIX button.
Programmed play function
With the programming function you can compile your own music programme. Before programming, the CD must be stopped by using the STOP button.
• Press the MEMORY/PROGRAM button.
• To select the required track number, press the SKIP/SEARCH button (forwards or backwards).
- Press the MEMO/PROGRAM button again in order to programme the selected track.
- Repeat steps 2 and 3 until all the required tracks have been programmed.
- Press the PLAY/PAUSE button. MEMO appears on the display.
- Press the STOP button in order to end the programmed play function.
- Press the MEMO/PROGRAM button and the PLAY/PAUSE button in order to continue using the programmed play function.
- Open the CD compartment or switch the CD player off in order to delete the programmed track order.
Equaliser function
The music can be played with three different equaliser curves (flat, classic and rock). Each equaliser curve emphasises treble, middle and bass in its own characteristic way. Press the EQ button to select the required equaliser curve.
USING THE RADIO
- Press the TUNER button in order to select the radio mode.
- Press the BAND button to select the waveband (AM or VHF/FM).
- Start the automatic tuning function by holding the SKIP/SEARCH button (forwards/backwards) down for 1-2 seconds. When it has located a station, the tuning function stops automatically. In the case of stations which have a very weak signal the automatic tuning function does not stop. If a VHF/FM station is received in stereo, this is indicated on the display.
Programming stations
It is possible to programme a maximum of 10 VHF/FM and 10 AM stations, i.e. a total of 20 stations.
- When a station with a good reception has been located (see section "Using the radio"), press the MEMO/PROGRAM button. MEMO/PROGRAM lights up on the display.
- Press the MEMO-UP/REPEAT button until the required programme location is displayed.
- To store the located station in the selected programme location, press the MEMORY/PROGRAM button; MEMO/PROGRAM disappears from the display.
- Repeat steps 2 to 5 to store further stations. If necessary, change the waveband using the BAND button.
Selecting programmed stations
- Select the waveband (VHF/FM or MW/AM) of the required station with the BAND button.
- Keep on pressing the MEMO-UP/REPEAT button until the required programme location and the station frequency appear on the display.
AERIALS
VHF/FM
Unwind the aerial cable entirely and put the aerial in such a position that the best possible reception is achieved. Note: do not connect the VHF/FM aerial cable to an outdoor aerial!
MW/AM
A ferrite aerial has been built into the appliance for MW/AM reception. The reception can be improved by turning the appliance.
USING THE HEADPHONES
Insert the headphones plug (3.5 mm stereo miniplug) into the headphones socket. This automatically switches the loudspeakers off.
CONNECTING OTHER APPLIANCES
If you wish to connect another audio appliance (e.g. a cassette deck) to your design audio system in order to use the system's loudspeakers to play music, you must connect this appliance with a cinch cable to the inputs marked "AUX" on the back of your design audio system. Then press the AUX button; it is now possible to start playing music from the connected appliance via the design audio system.
MAINTENANCE
Cleaning the device
Use a slightly damp soft cloth and a mild cleaning detergent. Use no chemicals, alcohol, thinning agents or other solvent-containing cleaners.
Malfunctions
Pull out the mains connection plug if a malfunction or incorrect function occurs; after a few seconds reconnect the electrical supply using the mains connection plug. When using the radio, other electrical appliances in the vicinity (e.g. televisions, monitors etc.) may cause interference. The appliance should be kept away from such sources of interference.
DECLARATION OF CONFORMANCE
We, Kompernaß Handelsgesellschaft mbH, Burgstr. 21, D-44867 Bochum, Germany, declare this appliance to be in conformance with all applicable international standards, safety requirements and EC Directives.
No. of appliance/Type: KH 350
Bochum, 31.12.2002
Hans Kompernaß
- Manager -

bar
| Category | Value | |---|---| | Category 1 | 100 | | Category 2 | 100 |
bar
| Category | Value | |---|---| | Top Bar | 100 | | Bottom Bar | 100 |
- e-bench
- TECHNISCHE DATEN
- DÉCLARATION DE CONFORMITÉ
- WERKING MET KOPTELEFOON
- MANUAL DE INSTRUÇÕES
- ANSLUTNING AV ANDRA APPARATER
- OPERATING INSTRUCTIONS
- Warning and Safety Information
- Caution! Danger of electric shock!
- SETTING-UP THE DEVICE
- POWER SUPPLY
- Remote control
- SWITCHING THE SYSTEM ON
- Connecting the loudspeakers
- Mains operation
- Inserting the batteries into the remote control
- Setting the time
- Adjusting the volume
- PLAYING A CD
- FURTHER CD PLAYER FUNCTIONS
- Repeat function
- Mix function
- Programmed play function
- Equaliser function
- USING THE RADIO
- Programming stations
- Selecting programmed stations
- AERIALS
- VHF/FM
- MW/AM
- USING THE HEADPHONES
- CONNECTING OTHER APPLIANCES
- MAINTENANCE
- Cleaning the device
- Malfunctions
- DECLARATION OF CONFORMANCE
Brand : EBENCH
Model : KH 350 DESIGN AUDIO SYSTEM WITH CD PLAYER AND DIGITAL RADIO
Category : Audio System